1. 정의

문법이 간단하고 다양한 패키지가 제공되어 생산성이 높으며, 유지 보수 비용이 적게 듦.

객체 지향적인 언어이며, 무료. 리눅스, 윈도우, 맥에서 설치 가능.


2. 설치

ㄱ. 사이트 접속
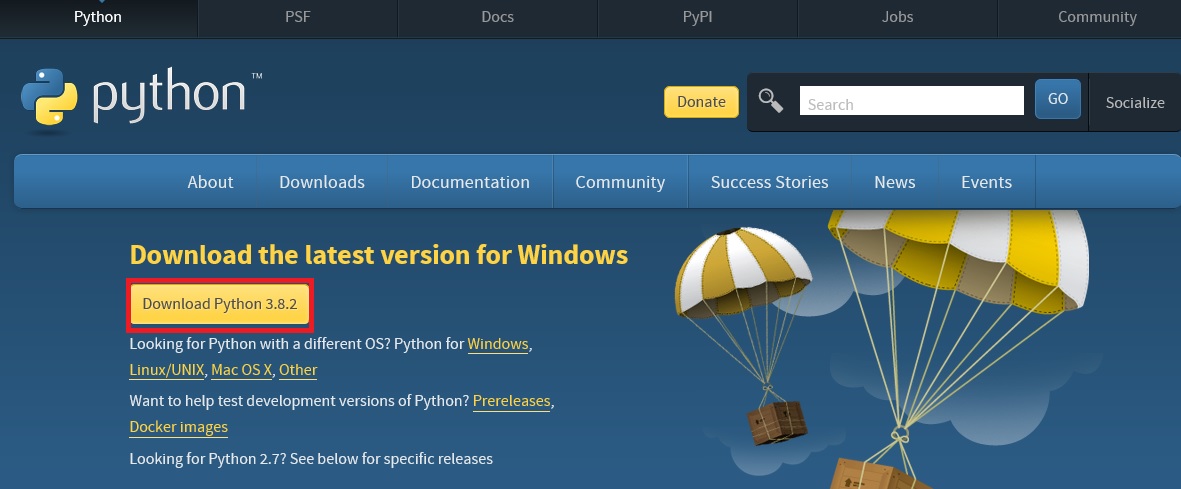
http://www.python.org/downloads/


Download Python

The official home of the Python Programming Language

www.python.org

사이트에 접속하여 'Download Python'을 클릭한다.

다운 받은 .exe 파일을 실행한다.


설치 중, 하단 아래쪽에 보이는 'Add Python 3.6 to PATH' 체크박스를 체크한다.

(도스에서 실행 가능하기 위한 체크)


ㄴ. IDLE 실행
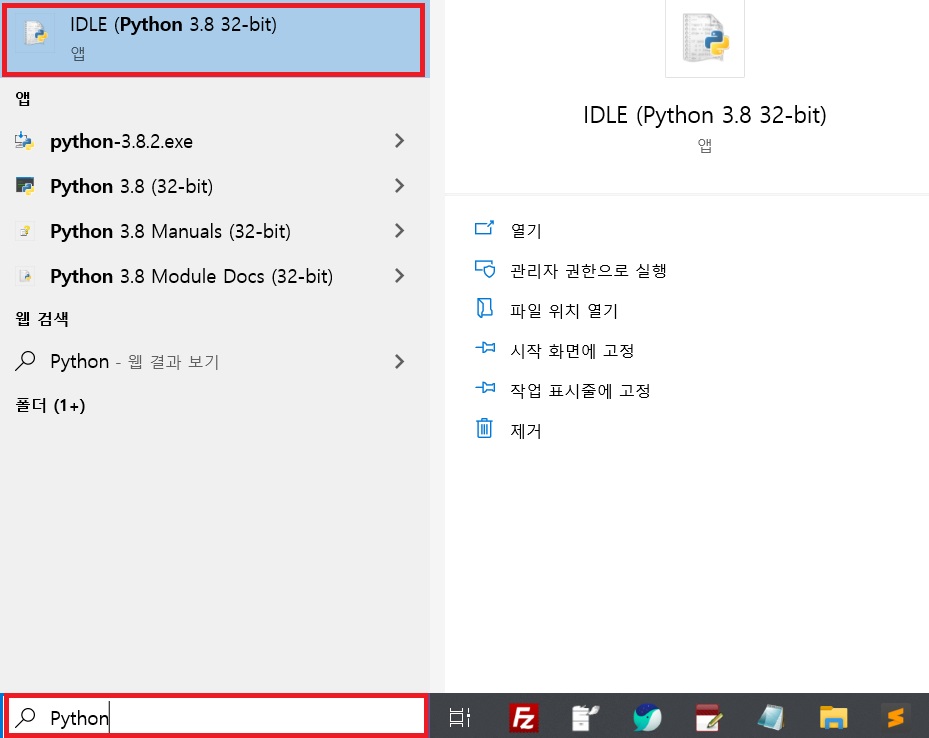
파이썬이 정상적으로 설치되었는지 알아보기 위해

Window 시작 버튼 > Python 3.X > IDLE (Python~ ) 파일을 실행한다.


실행시 마우스 커서가 정상적으로 깜빡거린다면, 프로그램이 잘 설치된 것.

1. setInterval()

일정한 시간 간격으로 작업 수행


2. clearInterval()

타이머를 중지하는 함수


3. setTimeout()

일정 시간 이후 작업을 한 번 수행하는 함수. 저장된 시간 사이에 작업 시간이 추가됨.


* 1초 = 1000ms (단위는 ms로 적어야 함)

html의 form 안에서 허용되지 않은 형식의 값 입력을 방지하기 위해 사용하며 submit 이벤트 발생시 입력 여부, 입력 형식을 검사한다.


JSON 형식으로 정의해 놓으면 스스로 동작하기 때문에 편리하게 사용할 수 있다.


* 참고 : https://jqueryvalidation.org

* 인코딩

네트워크를 통해 정보를 공유할 시, 어떤 시스템에서도 읽을 수 있도록 ASCII 문자로 바꿔주는 것이다.

모든 네트워크를 통한 전송에는 ASCII 문자를 기반으로 하고 있는데, 특히 한글이나 특수문자의 경우 2진수 바이트 코드로 변환해서 전송하면 반는 상대방의 시스템에 따라 해석이 불가한 경우가 많아지기 때문에, 인코딩이 필요하다.


1. escape()

특정 아스키 문자를 제외하고 전부 유니코드로 변환

encodeURI() 와 Component 의 중간 정도의 범위로 인코딩

16진수 형식으로 표시 (ex. 1바이트 : %XX / 2바이트 : %uXXX)


2. encodeURI()

인터넷 주소 표시에 쓰이는 특수문자들은 인코딩 하지 않음 (ex. : ; / = ? & 등은 인코딩 하지 않는다)

보통 파라미터를 전달하는 URI 전체를 인코딩시 사용


3. encodeURIComponent()

인터넷 주소 표시에 쓰이는 모든 문자를 인코딩

파라미터 하나하나 따로따로 인코딩시 많이 사용함

(한꺼번에 넘기는 경우, 파라미터 값 연결시 쓰이는 '&' 등도 인코딩 되어 버리니까)

http:// ... 가 http%3A%2F%2F로 인코딩됨


* java.net.URLEncoder.encode는 encoderURIComponent() 와 비슷하지만, encoderURIComponent() 가 인코딩 하지 않는 ! ( ) 3개도 인코딩 한다.


* 자바스크립트에서 지원하는 인코딩은 모두 utf-8 (Ajax도 utf-8)

* 자바스크립트에서 파라미터를 Controller 단으로 보내는 경우, 받는 Controller 단에서도 UTF-8 인코딩 처리를 해줘야 한다. [ ex. request.setCharacterEncoding("UTF-8"); ]


1
2
3
4
window.onload = function() {
    // scroll : yes, no, auto중 택1 가능
    window.documnet.body.scroll = "auto";    
}
cs

해당 팝업창으로 열리는 .jsp 페이지에 함수를 걸어 처리하였다.

1. 한글만 입력되도록

1
2
3
4
5
6
7
8
9
10
11
12
13
14
15
16
17
18
<script src="https://code.jquery.com/jquery-1.12.4.min.js"></script>
<script type="text/javascript">
$(function() {
    $('#hangeul').keyup(function() {
        onlyHangeul($(this));
    });
});
 
/*
 * 한글만 입력되도록 리턴(띄어쓰기 불가능)
 * ex) onlyHangeul($(this))
         $(this).val() = 나는12asdf4정말^^좋다b333
         return 나는정말좋다
 */
function onlyHangeul(obj) {
    var value = obj.val();
    obj.val(value.replace(/[^ㄱ-ㅎ가-힣]/g, '')); }
</script>
cs


2. 영문만 입력되도록

1
2
3
4
5
6
7
8
9
10
11
12
13
14
15
16
17
18
<script src="https://code.jquery.com/jquery-1.12.4.min.js"></script>
<script type="text/javascript">
$(function() {
    $('#english').keyup(function() {
        onlyEnglish($(this));
    });
});
/*
 * 영문만 입력되도록 리턴(띄어쓰기 불가능)
 * ex) onlyHangeul($(this))
         $(this).val() = 나는12asdf4정말^^좋다b333
         return asdfb
 */
function onlyEnglish(obj) {
    var value = obj.val();
    obj.val(value.replace(/[^a-zA-Z]/g, ''));  
}
</script>
cs


3. 숫자에 자동 콤마 생성

1
2
3
4
5
6
7
8
9
10
11
12
13
14
15
16
17
18
19
20
21
22
23
24
25
26
<script src="https://code.jquery.com/jquery-1.12.4.min.js"></script>
<script type="text/javascript">
$(function() {
    $('#numberComma').keyup(function() {
        numberComma($(this));
    });
});
 
/*
 * 숫자에 콤마 생성 후 리턴(띄어쓰기 불가능)
 * ex) onlyHangeul($(this))
         $(this).val() = 나는12asdf4정말^^좋다b333
         return 124,333
 */
function numberComma(obj) {
    var str = String(obj.val().replace(/[^0-9]/g, ''));
    // 가장 처음 숫자가 0인지 체크
    if (obj.val() != 0) {
        var reStr = str.replace(/(\d)(?=(?:\d{3})+(?!\d))/g, '$1,');
    } else {
        var reStr = '';
    }
    
    obj.val(reStr);
}
</script>
cs

ㄴㅇㄹㅇㄴ

ㄹㄴㅇ


ㄴㅇㄹ

ㄹㄴㅇㄹㄴㅇ

jsp에서 쉽게 차트나 그래프를 표현할 수 있는 api이며, 여러 모양이나 형태로도 손쉽게 구현이 가능하다.


1. Controller에 데이터를 담음

1
2
3
4
5
6
7
8
9
10
11
12
13
14
15
16
17
18
@Controller
public class HomeController {
    
    @RequestMapping(value = "/", method = RequestMethod.GET)
    public String home(Model model) {
        
        PercentVO percentVO = new PercentVO();
        
        percentVO.setYesPercent("40");
        percentVO.setNoPercent("60");
        
        System.out.println("debug> percentVO : " + percentVO);
        
        model.addAttribute("percentVO", percentVO);
        
        return "home";
    }    
}
cs

yesPercent에 40, noPercent에 60이라는 값이 들어있는 PercentVO 모델이 있다고 가정한다.


2. jsp Highcharts 구현

1
2
3
4
5
6
7
8
9
10
11
12
13
14
15
16
17
18
19
20
21
22
23
24
25
26
27
28
29
30
31
32
33
34
35
36
37
38
39
40
41
42
43
44
45
46
47
48
49
50
51
52
53
54
55
56
57
58
59
60
61
62
63
64
65
66
67
68
69
70
71
<%@ taglib uri="http://java.sun.com/jsp/jstl/core" prefix="c" %>
<%@ page session="false" %>
<html>
<head>
<title>Highcharts Example</title>
<!-- Highchars CDN -->
<script src="http://ajax.googleapis.com/ajax/libs/jquery/2.1.3/jquery.min.js"></script>
<script src="http://code.highcharts.com/highcharts.js"></script>
<script type="text/javascript">
$(function() {
    // body > div 부분에 적은 id를 파라미터로 직접 넘긴다.
    Highcharts.chart('container', {
         chart: {
             plotBackgroundColor: null,
            plotBorderWidth: 0,
            plotShadow: false,
            height: 500
         },
         title: {
            text: '',
            align: 'center',
            verticalAlign: 'bottom',
            y: -300,
            x: -80
        },
        credits: {
            enabled: false
        },
        tooltip: {
            pointFormat: '{series.name}: <b>{point.percentage: 1f}%</b>'
        },
        plotOptions: {
            pie: {
                dataLabels: {
                    enabled: true,
                    distance: -50,
                    style: {
                        fontWeight: 'bold',
                        color: 'white',
                        fontSize: '15px'
                    }
                },
                startAngle: -90,
                endAngle: 90,
                center: ['50%''75%']
            }
        },
        series: [{
            // Highcharts를 pie 형태로 구현했다.
            type: 'pie',
            name'응답률',
            innerSize: '20%',
            /*    
                data: [name:'params1', value:'params2'] 의 형태이다.
                name과 value는 생략이 가능하며, 'params1'과 'params2' 값만 적어도 무방하다.
                * 주의 *
=> Highcharts로 표현하려는 값이 변수일 경우에는 반드시 JSON.parse() 함수 안에
                변수 값을 적어야 한다.
            */
            data: [
                ['YES(${percentVO.yesPercent}%)', JSON.parse('${percentVO.yesPercent}')],
                ['NO(${percentVO.noPercent}%)', JSON.parse('${percentVO.noPercent}')],
            ]
        }]
    });
});
</script>
</head>
<body>
    <div id="container" style="min-width:350px;height:200px;max-width:250px;margin:0 auto"></div>
</body>
</html>

cs


실제로 작업 당시 series의 data 부분에 변수를 넣어야 했는데 아무리 검색을 해도 나오지 않았고, JSON 형태로 담아야 파라미터가 출력된다는 검색 결과들에 힌트를 얻어 해결할 수 있었다.

1
2
3
4
5
6
7
8
9
10
11
12
13
14
15
16
17
18
19
20
21
22
23
24
25
26
27
28
29
30
31
32
33
34
35
36
37
38
39
40
41
42
43
44
45
46
47
48
49
50
51
52
53
54
55
56
57
58
59
60
61
62
63
64
65
66
67
68
69
70
71
72
<%@ page language="java" contentType="text/html; charset=UTF-8"
    pageEncoding="UTF-8"%>
<!DOCTYPE html PUBLIC "-//W3C//DTD HTML 4.01 Transitional//EN" "http://www.w3.org/TR/html4/loose.dtd">
<html>
<head>
<meta http-equiv="Content-Type" content="text/html; charset=UTF-8">
<title>rowspan example</title>
<script src="https://code.jquery.com/jquery-2.2.1.js"></script>
<script type="text/javascript">
 
$(function(){
    $('#rowTable').each(function() {
        var table = this;
        // rowspan할 tr(세로 기준)
        $.each([1,4], function(c, v) {
            var tds = $('>tbody>tr>td:nth-child(' + v + ')', table).toArray();
            var i = 0, j = 0;
            
            for(j = 1; j < tds.length; j ++) {
                if(tds[i].innerHTML != tds[j].innerHTML) {
                    $(tds[i]).attr('rowTable', j - i);
                    i = j;
                    continue;
                }
                $(tds[j]).hide();
            }
            j --;
            
            if(tds[i].innerHTML == tds[j].innerHTML) {
                $(tds[i]).attr('rowTable', j - i + 1);
            }
        });
    });
});
 
</script>
</head>
<body>
    <h1>중복 데이터 셀 병합</h1>    
    <!-- table id를 적고 제이쿼리에서 id 값으로 불러온다. -->
    <table border="1" style="border-collapse:collapse;border:1px gray solid;" id="rowTable">
        <thead>
            <tr>
                <th>제목</th>
                <th>제목</th>
                <th>제목</th>
                <th>제목</th>
            </tr>
        </thead>
        <tbody>
            <tr>
                <td>1</td>
                <td>2</td>
                <td>3</td>
                <td>4</td>
            </tr>
            <tr>
                <td>a</td>
                <td>b</td>
                <td>c</td>
                <td>d</td>
            </tr>
            <tr>
                <td>a</td>
                <td>2</td>
                <td>3</td>
                <td>d</td>
            </tr>
        </tbody>
    </table>
</body>
</html>
cs

colspan도 이와 같은 방식으로 적용시키면 된다.

Atom은 google에서 만든 edit 프로그램이며, git과 바로 연동할 수 있다는 가장 큰 장점을 가진 프로그램이다.


1. 홈페이지 접속하여 해당 OS에 맞는 프로그램 다운로드

https://atom.io/ 사이트 접속 > 홈 화면에 나와 있는 window download 클릭


2. 다운로드 받은 파일 실행

해당 경로에 다운로드 된 파일을 실행한다.


아톰은 그간 사용했던 이클립스에 비해 굉장히 경량의 프로그램이기 때문에 다운로드 시간도 오래 걸리지 않는다.


다운로드 받은 파일을 실행하면 가장 처음으로 실행되는 화면은 이렇게 나올 것이다.


3. 패키지 추가

Atom 상단의 File > Settings > Pasckages 에 접속하여 각자의 취향에 맞는 패키지(플러그인)을 설치할 수 있다.


* 추천하는 패키지

패키지명

 쓰임

 angularjs

 AngularJS 개발시 태그를 자동 완성

 atom-beauty

 HTML, CSS, JS, PHP, Python, Ruby, Java, C 등의 언어를 사용시 indentation을 정리해주는 패키지

 atomic-chrome


 code-peek

 선택한 함수가 정의되어 있는 파일을 열어 자동으로 대조

emmet

 HTML, CSS 등 언어 구조, 여러 개의 구조를 가진 태그 자동 완성

(!html 입력시 기본 html 코드 구조 자동 완성)

 file-icons

 파일명 앞에 파일 확장자에 따른 아이콘을 붙여줌

 highlight-selected

 선택한 코드를 강조

 linter

 HTML, CSS, Javascript, TypeScript 등의 코드를 분석하여 문법 및 유효성을 검증

 linter-csslint

 linter css 버전

 linter-eslint

 linter JavaScript 버전

 linter-sass-lint

 linter Sass / SCSS 버전

 minimap

 전체 코드의 프리뷰 기능을 제공하고 툴의 오른쪽에서 코드 전체 윤곽을 확인하거나 위치를 확인

 pigments

 CSS 파일의 #FF530D 형태의 컬러 값을 직관적으로 표시

 tool-bar

 툴바의 아이콘 중 커피스크립트 등의 파일들을 구분이 쉽도록 파일의 특징을 나타낸 아이콘으로 표시

 atom-html-preview

 해당 html 화면을 미리 보여줌

 docblockr

 작성한 스크립트에 대해 설명 추가시 가독성을 높임


1. body class="container"

1
2
3
4
5
6
7
8
9
10
11
12
13
14
15
16
17
18
19
20
21
22
23
<!DOCTYPE html>
<html>
<head>
    <meta charset="UTF-8">
    <title>class test</title>
    <link rel="stylesheet" href="https://maxcdn.bootstrapcdn.com/bootstrap/3.3.7/css/bootstrap.min.css">
    <script src="https://ajax.googleapis.com/ajax/libs/jquery/1.12.4/jquery.min.js"></script>
    <script src="https://maxcdn.bootstrapcdn.com/bootstrap/3.3.7/js/bootstrap.min.js"></script>
</head>
</head>
<!-- body에 class element를 적용한 경우 -->
<body class="container">
    <div>
        <h1>h1 Bootstrap heading(36px)</h1>
        <h2>h1 Bootstrap heading(30px)</h2>
        <h3>h1 Bootstrap heading(24px)</h3>
        <h4>h1 Bootstrap heading(18px)</h4>
        <h5>h1 Bootstrap heading(14px)</h5>
        <h6>h1 Bootstrap heading(12px)</h6>
    </div>
</body>
</html>
cs


2. div class="container"

1
2
3
4
5
6
7
8
9
10
11
12
13
14
15
16
17
18
19
20
21
22
23
<!DOCTYPE html>
<html>
<head>
    <meta charset="UTF-8">
    <title>class test</title>
    <link rel="stylesheet" href="https://maxcdn.bootstrapcdn.com/bootstrap/3.3.7/css/bootstrap.min.css">
    <script src="https://ajax.googleapis.com/ajax/libs/jquery/1.12.4/jquery.min.js"></script>
    <script src="https://maxcdn.bootstrapcdn.com/bootstrap/3.3.7/js/bootstrap.min.js"></script>
</head>
</head>
<body>
<!--div에 class element를 적용한 경우 -->
    <div class="container">
        <h1>h1 Bootstrap heading(36px)</h1>
        <h2>h1 Bootstrap heading(30px)</h2>
        <h3>h1 Bootstrap heading(24px)</h3>
        <h4>h1 Bootstrap heading(18px)</h4>
        <h5>h1 Bootstrap heading(14px)</h5>
        <h6>h1 Bootstrap heading(12px)</h6>
    </div>
</body>
</html>
cs


부트스트랩 적용시 class 요소를 body에 붙여도, div에 붙여도 둘 다 정상적으로 동작하는 것을 확인할 수 있다. 

'FrontEnd > CSS & HTML' 카테고리의 다른 글

HTML :: 하이퍼링크로 팝업창 열기  (0) 2016.05.12
HTML :: <pre>  (0) 2016.04.02
HTML :: select optgroup  (0) 2016.03.10
HTML :: id vs name  (0) 2016.03.01

+ Recent posts